The calves are one of the most neglected muscles and one of the most stubborn. You must hit them like any other muscle to train them correctly to see physique and athletic benefits. The machine-seated calf raises exercise is one of the most crucial for building your calves.
Here is what we will cover in today’s article about seated calf raises:
- What is the seated calf raise?
- Muscles worked in the seated calf raise
- Benefits of the seated calf raise exercise
- Seated calf raise vs. standing calf raise: What’s the difference?
- How to perform the seated calf raise
- Seated calf raise variations
- Seated calf-raise alternatives
- Programming tips for calves
- Sample calves workout plan
- Is the seated calf exercise the best calves exercise?
What is the Seated Calf Raise?
Like a biceps curl for the biceps, a seated calf raise is an isolation exercise focusing on the calf muscles. Bigger movements like a squat or deadlift will accomplish more for building the muscles of your lower body and building strength. However, isolation movements like the seated calf raise the need to be prioritized unless you are one of the few genetically gifted people with tree trunk calves.
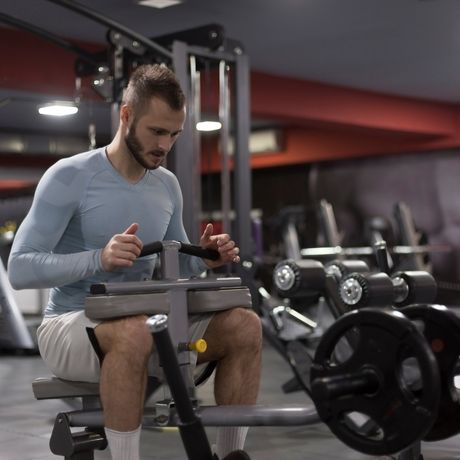
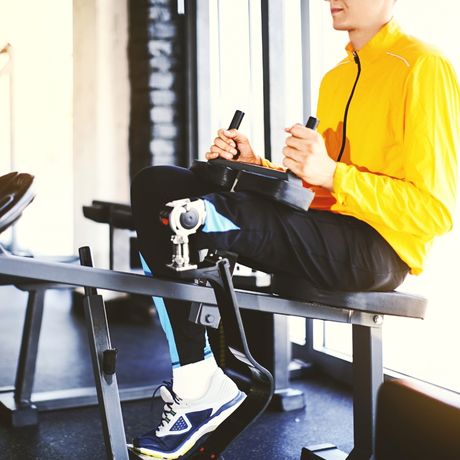
Unlike the standing calf raises, the seated calf raise is performed using a machine and sitting on a seat. This makes it a very beginner-friendly exercise if you are new to training your lower body, as it takes the balance portion and upper body muscles out of the equation.
Once seated, the exercise is done by lifting your heels while your knees are bent and leveraged into the machine. This allows your ankle to perform plantar flexion, pointing your toes down. The key to this exercise is the bend in the knee. This allows the knee angle to be deep enough to target the soleus muscle instead of the gastrocnemius.
Let’s dive into these muscles.
Muscles Worked in the Seated Calf Raise
It’s important to note that this exercise mainly targets the soleus, but the gastrocnemius will also get some training stimulus. This is because we cannot turn off muscles; this exercise targets the soleus better due to the position of the leg. This makes it extremely important to train both muscles from different angles. For example, the soleus isn’t targeted much during standing calf raises and vice versa for the gastrocnemius and seated calf raises.
Soleus: The soleus is often the forgotten muscle of the calves. It is located on the back of the lower leg and runs from below the knee to the heel. It is somewhat hidden beneath the gastrocnemius, even though they are sometimes considered one muscle that works together.
It is responsible for the plantar flexion of your foot and is essential to everyday tasks like walking, running, and maintaining balance. The soleus comprises 60-90% slow twitch muscle fibers, which is more geared towards endurance than fast twitch sprinting. This makes it especially important when walking as it becomes the primary muscle used for plantar flexion.
The average adult takes around 5,000 steps a day, and the soleus is the prime mover for every single one of them while maintaining your balance. Even though it’s working nonstop during these steps, more training stimulus is needed to build and strengthen the soleus. Enter the seated calf raise.
Gastrocnemius: This muscle has two heads and runs from just below the knee on the back of the leg and to the heel. It crosses the ankle and knee joints, whereas the soleus only crosses the ankle joint. It is the bigger of the two muscles and gets most attention. Its plantar flexes the ankle joint and the leg at the knee joint.
It is commonly known as the runner’s muscle and is mainly composed of fast-twitch muscle fibers, unlike the soleus. This means it’s hard work during fast movements like jumping or sprinting. Unfortunately, this also makes the gastrocnemius more prone to injuries than the soleus. Therefore it’s vital to perform gastrocnemius exercises and stretches to stay injury free.
Benefits of the Seated Calf Raise Exercise:
Below we cover some of the primary benefits of including the seated calf raise into your workout regimen.
1. Builds the calf muscles
We touched on this briefly, but this exercise is necessary for your programming as it’s the only way to target the soleus muscle. By hitting your calf muscles from all angles with the appropriate biomechanics, you can increase their size.
Nobody wants stick legs, and the calves are often the first place people look as they are exposed to the eye in shorts. Most people only do calf raises from the standing position, which leaves the soleus almost untouched and untrained. Since they are closely related and often referred to as one calf muscle, building the soleus to increase size is essential.
2. Increase performance
The soleus works alongside the gastrocnemius during explosive movements. Therefore, training them with the seated calf raise exercise will not only ensure there isn’t an imbalance but also allow you to increase your explosiveness and power.
3. Improve balance
Using this exercise to train your soleus will help your body handle force in the ankle joint as the movement increases your range of motion and strength. A stronger ankle joint leads to better stabilization and ensures the knee and hip can do their job. Remember, the ankle is the foundation of the house, and if that is not strong, the rest of the house will likely crumble.
4. Decrease the chance of injury
Strengthening the soleus will also increase the strength of your Achilles tendon. Think of that muscle as a tight rubber band that absorbs force as high as ten times your body weight. This and a stronger ankle joint will allow your body to better handle high-impact activities like jumping and running. Also, strengthening the soleus to function alongside the gastrocnemius will decrease the likelihood of straining the gastrocnemius.
5. Easy to use
The seated calf raise is a beginner-friendly exercise, taking the balance portion of standing out of the equation. If you are new to training your calves, it’s a great starting point to build strength. Remember, it is not the end all be all of the training calves, but as a beginner progression, it makes it very easy to isolate and feel the calves working as you strengthen them.
Seated Calf Raise vs. Standing Calf Raise: What’s The Difference?
To the untrained eye, the only difference is that one is seated and standing. By now, after learning a little bit about the muscles of the calf, this is not the complete answer to the question. The standing calf raise is done with a straight leg position. This is why its many variations are done standing instead of seated. The standing calf raise will primarily target the gastrocnemius and do little for the soleus. The seated calf raise is done with your leg bent at a 90-degree angle. The seated calf raise is the only exercise that primarily allows you to target the soleus.
Think of these two exercises and muscles as someone asking what’s more important, the tires or the breaks? They are equally important and must be cared for in their unique way. It’s the same concept with the soleus, gastrocnemius, and these two exercises. They both target something specific and are part of a complete calf training program.
This means that for programming these exercises, you want to emphasize each equally. The exceptions would be if you have been strictly doing standing calf raises for some time. You should put extra effort into training the soleus in a seated position until it catches up in strength. This way, your lower body will function correctly and keep you from getting injured. For a more in depth look into calf training make sure to check out our article that covers the best calves exercises.
How to Perform The Seated Calf Raise
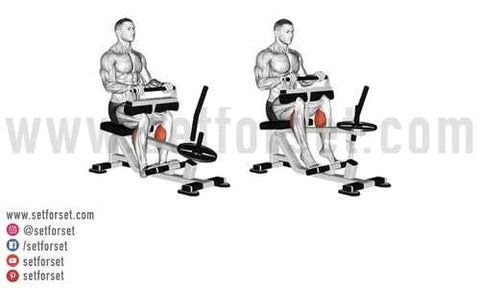
As we mentioned, the beauty of the seated calf raise is its simplicity. It’s a beginner-friendly exercise that makes it easy to start training your calves. However, with all calf exercises, there are some principles you need to remember and mistakes to avoid. So let’s dive into how to do it first.
- Sit down on the machine and set up with your back straight and in an excellent, upright, proud posture.
- Put the balls of your feet directly onto the platform leaving room for your heels to hang off the edge, and make sure your toes are pointing forward.
- Put your thighs under the knee pad and ensure it’s centered between your knees and upper thigh.
- Place your hands on the pad and release the safety bar to begin the exercise.
- Slowly lower your heels towards the floor as far as you can as if you are resisting the weight as your calves and ankles stretch on the way down.
- After you have lowered down, press the balls of your feet into the plate and raise your heels until they are extended up.
- Repeat for desired reps.
5 Common Mistakes & Form Tips:
If you’ve seen people in the gym performing seated calf raises then you’re more than likely to have seen some common mistakes with form and technique. Below we highlighted some of the most common issues when doing seated calf raises.
- Don’t use momentum: The biggest problem with calf training is people bouncing through the reps and not controlling the exercise. This may help you feel some muscle burning, but it will almost always make you neglect the eccentric portion of the lift. For example, instead of moving fast, lower slowly for 3 seconds, pause at the bottom, lift for 3 seconds, and pause at the top. By doing this, you will feel a massive contraction as the calves are working, and not only will it strengthen the mind-muscle connection, it will strengthen them in a much better way.
- Losing tension at the bottom: For some seated calf raise machines, this will not be an issue, but if your machine allows you to take your heel to the floor, keep reading. Touching your heel to the floor will release tension from the calf muscle. This is important because as you strengthen the calves, they must transition from eccentric to concentric. Keep your heel off the floor while slowly moving through the reps.
- Pressing through toes: This may never have crossed your mind, but pushing through your toes also hinders your performance. Remember the setup tips, place the balls of your feet on the plate, and that is where you should be pressing through.
- Poor posture: It’s common to see people struggling through the reps and starting to lose their posture by leaning back as they lift their heels during the movement. Imagine you are sitting at a 90-degree angle, and make sure to keep your back upright. This will ensure you don’t injure your lower back during this movement.
- Not using the full range of motion: This tip ties all mistakes together with a bow. If you are going too fast and not controlling the movement, you will use a short range of motion. This will give you a burn and may build your calves, but they won’t function as needed. Think of letting your heels go as low as you possibly can and also raising them as high as you possibly can. You guessed it… all while doing this as slowly and controlled as possible.
3 Seated Calf Raise Variations
Now that we covered the main exercise you came here for, the seated calf raise, we also wanted to give you 3 variations to try in case you don’t have access to a seated calf raise machine.
1. Seated dumbbell calf raise
Whether you don’t have access to the seated calf machine or if it’s being used by someone else (most gyms only have one), this variation is a great alternative. It also can be used to target the soleus unilaterally much easier than other variations.
- Sit down on a bench with a dumbbell and set up a 45-pound plate on the floor. You can also use a bench with risers if you can access them.
- Bend your legs at a 90-degree angle and place the dumbbells on top of your thighs just above your knees while holding onto them tight.
- Slowly lower your heels under control and raise them as high as possible.
- Repeat for desired reps.
Related: Best Dumbbell Calf Exercises
2. Barbell seated calf raise
This is another excellent variation if you can’t access the seated calf raise. Based on your preference, it may be easier to control than the dumbbells. The barbell will also help you increase the load you use to train the calves during this exercise.
- Sit on a bench with a barbell loaded with the necessary weights. Set up a 45-pound plate on the floor or something to elevate your heels.
- Bend your legs at a 90-degree angle and place the barbell on top of your thighs just above your knees while holding onto it tight.
- Slowly lower your heels under control and raise them as high as possible.
- Repeat for indicated reps.
3. Smith machine seated calf raise
This is similar to the barbell seated calf raise, but the smith machine will allow you some assistance, almost like someone is spotting the exercise. It can be tricky since the smith machine is not at a perfect straight up and down the line, but for some people, the angle helps them feel the calves working even better.
- After loading the switch machine with the necessary weights, sit on a bench. Lower the bar down to the correct position.
- Bend your legs at a 90-degree angle and place them under the barbell above your knees. Unrack the bar to begin the exercise.
- Slowly lower your heels under control and raise them as high as possible.
- Repeat for indicated reps.
3 Seated Calf Raise Alternatives
For those who want to mix it up with seated calf raise alternatives give these a try!
1. Standing calf raise
If you don’t have access to any of the seated calf raise options, a standing calf raise is still a great option, as it’s an important part of calf training. It will primarily target the gastrocnemius, but the soleus will also get some activation.
- Stand into the calf raise machine with your shoulders pressing into the pad. Then, stand up and unpack the machine with the balls of your feet on the plate.
- Slowly lower your heels under control until you reach the bottom of the rep, and then slowly lift your heels by pressing the balls of your feet into the plate.
- Repeat for desired reps.
2. Donkey calf raise
This is an excellent addition to your program as far as bodyweight leg exercises go. Of course, if you feel like Arnold, you can have someone sit on your back to add extra weight, but we don’t recommend starting with that option.
- Set up something to elevate your heels, like a plate or bench with risers. Place a bench in front of you for your upper body to lean into
- Standing on the plate with the balls of your feet so that your heels are hanging off, lean forward and place your hands on the bench, ensuring your back is flat.
- Keeping your back flat and legs straight, slowly lower to the bottom of the rep and then lift your heels to the top of your range of motion.
- Repeat for desired reps.
3. Floating heel lunge calf raise
This one is a much more advanced variation, but it is an excellent addition to your program if you are an athlete. It strengthens the soleus in a deep lunge position, strengthening the entire chain of your leg, starting at the ankle and calves. Again, it is best done with body weight to start, and once you are ready, it can also be progressed with weight.
- Set up a 45-pound plate on the floor. Get into a lunge position with your front foot on the plate, with only the balls of your feet touching the plate. Your heel should be floating off the end.
- Lower yourself down into a lunge and hold in this position
- Holding the lunge, slowly lower your heel as far as you can without touching the floor, and then raise your heel as high as you can without moving the rest of your lower body.
- Repeat for desired reps.
Seated Calf Raise Programming Tips
Try to keep in mind some of the following tips next time you’re at the gym.
- For strength: Add 3 sets of 6-8 reps to your lower body days and your standing calf raise routine.
- For hypertrophy: Try doing 3 sets of 10-12 reps focusing on an extra slow tempo for the eccentric and concentric.
- For endurance: Try 3 sets of 15-20 reps but make sure you do not start to use momentum and shorten your range of motion.
Since the soleus muscle in the seated calf raise is primarily slow twitch muscle fibers, it can be worked more often than other muscle groups. However, calves are stubborn enough, and if yours are lagging in size or strength, try hitting them 3 days a week on whatever day you will be sure to do them.
Sample Workout Plan
We crafted a sample leg day below and how the seated calf raise would be incorporated into it. Take a 60-90 second rest in between each set.
| Exercise | Sets | Reps |
| Bodyweight Glute Bridge | 2 | 25 |
| Barbell Squat | 4 | 6 |
| Romanian DB Deadlift | 3 | 8 |
| DB Walking Lunges | 2 | 12 |
| Standing Machine Calf Raises | 3 | 10 |
| Seated Machine Calf Raises | 3 | 12 |
| Unilateral DB Seated Calf Raises | 2 | 12 |
Is the Seated Calf Raise Exercise The Best Calves Exercise?
The seated calf raise is the best exercise for the soleus muscle. Overall, remember that calves are the sum of their parts. The gastrocnemius and soleus must be trained appropriately to ensure no imbalances and injuries later on.
By now, you should fully understand how the calf muscles work and the importance of training them as a system. Of course, we want big muscular calves that look great in shorts in the summer, but you also should now know how important the calves are in your movement and the stability of your entire body. Make sure to train them and balance them out so they aren’t all show and no-go.


