But it can take years to get to the point in which your calisthenics resembles that of a flawless gymnastics routine, and the journey to get there is tough. In fact, the steep learning curve combined with feelings of intimidation causes many to never even begin calisthenics.
On top of this, if you’re not sure what to look for in a plan, finding a program that teaches calisthenics for beginners can feel challenging and overwhelming.
If you’re in search of a true calisthenic beginner plan, you’ve come to the right place. Forget about flags, weighted muscle-ups, and one-arm push-ups (at least for now). This article is for those who have an ambitious calisthenics end goal but know they need a well-laid-out path to get there.
We’re talking to you, calisthenics beginners.
We’re about to break down calisthenics and the easiest versions of the most important exercises to get you started. We’ll then lay out what you need to do to progress from the beginner phase to the intermediate stage.
Table of Contents:
- What is Calisthenics Training?
- Best Beginner Calisthenics Exercises
– Chest, Shoulders, & Triceps Exercises
– Back & Biceps Calisthenics Exercises
– Lower Body Calisthenics Exercises
– Calisthenics Circuit - The Secret To Improving Your Calisthenics Practice
- Calisthenics Workout For Beginners
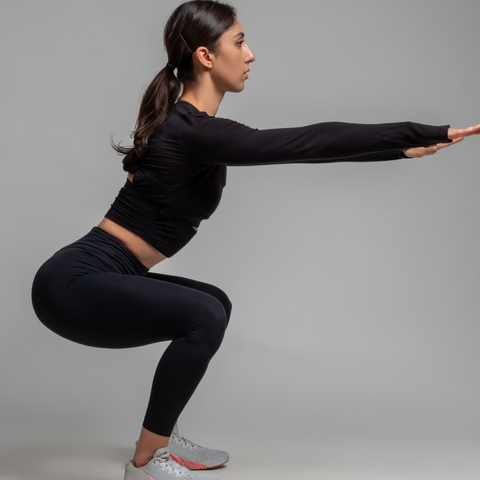
What Are Calisthenics?
Calisthenics is a method of resistance training that relies on using your body weight for the load.
With calisthenics, some exercises still require equipment, but these are typically very basic pieces of equipment that won’t break the bank. We have a round-up of some of the best calisthenics equipment, including options like pull-up bars, dip stations, rings, and bands.
In addition, advanced trainees might even use external loading apparatuses, such as weighted vests, to increase the body’s weight. The primary variable is that only the body is used as a load to put stress on the muscles. If weight is used, it’s attached to the body somehow to make it heavier.
Calisthenics Vs Bodyweight Training
One question that may come up is: What’s the difference between calisthenics and bodyweight training? It comes down to semantics. Calisthenics is close to being the same thing as a bodyweight workout.
If we had to distinguish, calisthenics is a training method, while bodyweight training is a type of training. In other words, if someone says, “I train calisthenics,” it implies it’s their primary form of training, and they have the goal of mastering more advanced movements.
On the other hand, bodyweight training means you use bodyweight exercises in your program, in addition to free weights and machines.
Calisthenics Vs Free Weights & Machines
The other comparison is between calisthenics and free weights. This one is a bit more obvious but the main difference is that calisthenics measures your relative strength, which is how strong you are compared to your body weight.
In comparison, free weights measure your absolute strength, which is your strength regardless of your body weight.
In addition, your exercise selection is much smaller with calisthenics. With free weights, you can manipulate the weights however you like, allowing for more variation. And last, it’s significantly easier to load and progress with free weights.
The Best Beginner Calisthenics Exercises
Let’s get into it! We’ve got the best calisthenics exercises for beginners and how to follow proper form when performing each. As we’re gearing this toward beginners, each featured exercise will include its simplest version.
We recommend beginners divide exercises into 3 muscle groups:
- Upper Body Pushing (Chest, Shoulders, Tricep Muscles)
- Upper Body Pulling (Back, Biceps)
- Lower Body
Being a calisthenics beginner does have its advantages. One such advantage is you don’t need a plethora of movements. Similar to a beginner free weight workout, you only need to focus on a few primary movements. In addition, many of these exercises can be made to be calisthenics for beginners at home, as minimal equipment is required.
The main priority of a beginner calisthenics workout program isn’t to do a bunch of fancy tricks or hit the muscle from every angle. While some variety is beneficial, your main focus is to concentrate on mastering the fundamentals.
3 Best Chest, Shoulders, & Triceps Beginner Calisthenics Exercises
The first group of exercises is for the upper body pushing muscles. When performing these, your ultimate goal is to eventually progress to advanced forms of the exercises.
1. Incline Push Ups:
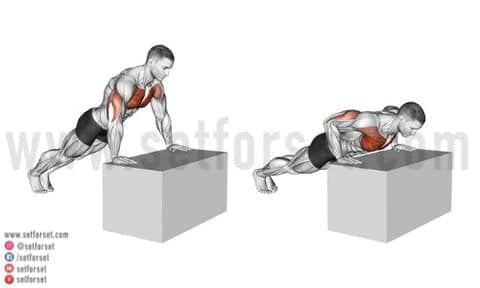
This push-up variation has you perform push-ups with your body on an incline and your head above your feet. This takes away a large percentage of your body weight, making them easier and more manageable for beginners.
While these are “incline” push-ups, they actually resemble a decline bench press, meaning you will activate the lower chest more. If you try an incline push-up and it’s too challenging, you can modify this further by performing wall push-ups.
How to do Incline Push Ups:
- Use an elevated object with a ledge, such as a box or sturdy table.
- Place your hands on the ledge with your palms on the edge, or wherever is comfortable.
- Stand back from the elevated object while extending your arms, so your body is at an angle and leaning forward.
- Lower your body down to your hands, and keep your elbows tucked in at a 45-degree angle. Bend your elbows to lower until the ledge hits your chest.
- Now push up and fully extend your arms. Keep your core braced the entire time.
2. Negative Push Ups:
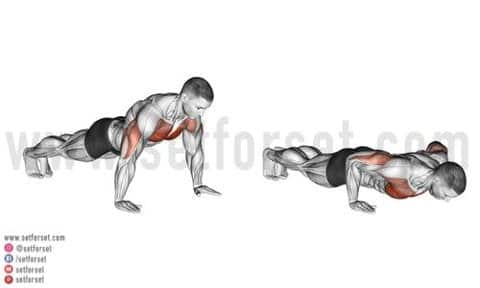
Negative push-ups take advantage of the eccentric muscle contraction, which is when the muscle lengthens, usually during the lowering portion. This helps produce more force.
While you may not be able to do a bunch of traditional push-ups, you can knock out quite a few negative push-ups as a way to achieve muscle hypertrophy.
The set-up is the same as your traditional push-up, but you’ll emphasize the “going down” part of the exercise.
How to do Negative Push-Ups:
- Get in a push-up position with hands slightly wider than shoulder-width apart. Turn your hands out slightly. Keep a tight core and straight torso.
- Slowly lower your body in a controlled motion. As you come down, tuck your elbows in at around a 45-degree angle.
- Lower all the way until your chest hits the ground.
- Get on your knees to get back into the starting position and repeat.
3. Dips With Feet On The Ground:
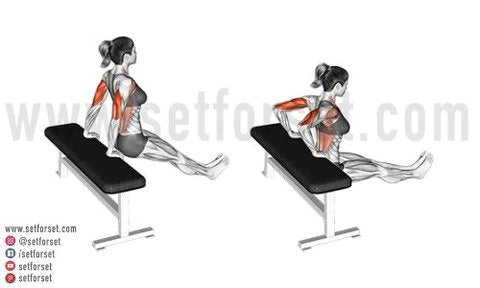
Our last pushing movement is dips, which trains your shoulders, triceps, and chest. While standard dips are tough, you can modify them by placing your feet out in front of you on the ground.
For this move, you can use one chair or a bench, two chairs (one on each side of you), or parallette bars. Utilize whatever is available to you!
How to do Dips With Feet on Ground:
- Set up your box, bench, chair, or bars, and place your hands on your equipment of choice. If using a chair or bench, it’s important to put your hands on the edge so your fingers can wrap around the edge.
- Extend your legs straight in front of you. Keep your upper body upright, and your lower body in a straight line.
- Lower your body slowly while keeping your elbows tucked in. Keep your forearm relatively vertical with your upper arm bending down as you lower.
- Lower until the top of your arms are parallel to the ground.
- Brace your core and extend your arms, pushing your body up. Keep your torso vertical during the entire movement.
3 Beginner Back & Biceps Calisthenics Exercises
These movements train all of your pulling muscles. This is primarily your back but also includes your biceps and rear deltoids.
Thanks to these exercises, you’re well on your way to enjoying the many benefits of pull ups.
1. Inverted Ring Rows:
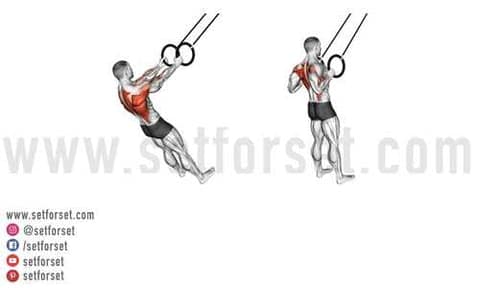
Chin-ups and pull-ups are very challenging movements. One of the best calisthenics exercises to prepare for these is inverted rows.
We need to clarify this, though, because inverted rows are often placed in advanced workouts as well. What makes these more or less challenging is the angle of your body. If you adjust your bar or handles so your body lays flatter, you will have to lift a greater percentage of your body weight.
On the other hand, if you use a higher grip so that your body is more vertical, lifting is easier. This is why we like using rings, as you can easily adjust them. If you are a true beginner, you will likely need to start with your body relatively high, around a 45-degree angle, possibly steeper. Wherever you need to start is fine.
As you progress, you can lower the rings so that your body becomes more parallel to the ground. This causes you to lift a greater percentage of your body weight, leading to building muscle. And, you’ll improve your core strength, which will transfer over to pull-ups.
How to do Inverted Ring Rows:
- Set up your rings low enough so you can start with your arms straight. As mentioned, the starting position will vary for everyone depending on strength levels.
- Plant both feet flat on the ground with your toes pointing forward and your legs straight. Holding the handles, let your torso fall back as your arms extend out in front of you.
- Keep your entire body straight with your arms fully extended in front of you. Pull your shoulder blades back. Brace your core and prepare to pull.
- Begin by pulling your elbows straight back. Pretend there’s a wall behind you that runs parallel to your body. Now visualize trying to drive your elbows back to touch it.
- Try to get your chest to ring level, and then slowly let your body drop.
- If you don’t have rings but do have gym access, use a Smith machine instead. This will allow you to place the bar at differing heights.
2. Resistance Band Pull Ups:
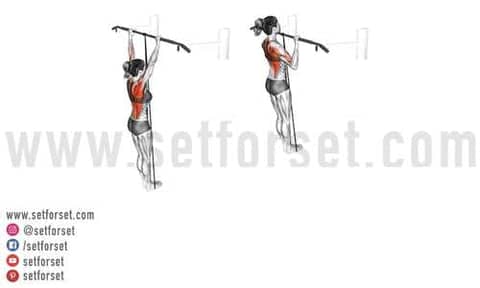
We’re not doing machine pull-ups here, as we believe pull ups with resistance bands do a much better job preparing you for full-fledged pull ups.
The resistance band provides assistance, yet your lower body is still able to sway, activating your core strength. Further, these are easy to progress as you can use smaller bands.
Always use a quality resistance band and inspect it for wear prior to exercise.
How to do Resistance Band Pull Ups:
- Wrap a resistance band around a sturdy bar, letting one loop hang. Depending on the bar’s height and the resistance band’s thickness, you can either place your foot or knee in the loop.
- We recommend only placing one leg in the strap. Having a hanging leg gives you more control if something happens and you need to catch yourself.
- Grab the bar with an overhand grip that is shoulder width apart. Let yourself lower into a dead hang and brace your core.
- Pull your shoulder blades back and slightly lean back. Drive your elbows straight down while slightly driving your chest forward.
- Continue driving your elbows down as you think about pulling the bar down. Do this until the bar reaches your chest; lower slowly.
3. Negative Chin Ups:
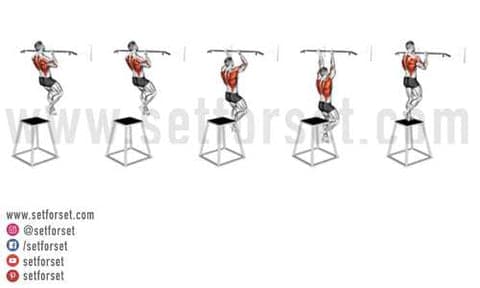
Negative chin-ups are a must for any calisthenics workout routine for beginners, as they take advantage of eccentric muscle contractions, allowing for more work.
These are performed by cheating somehow to get in the top position, with your arms fully flexed and your head above the bar. When ready, you slowly lower yourself in a controlled manner.
You generally want to start with a 3-second descent and then lengthen it from there.
How to do Negative Chin Ups:
- Grab a pull-up bar with an underhand grip. If needed, use a chair or box to help get in the top position. Pull your torso all the way up, so your head is above the bar.
- Brace your core to stop swinging. Slowly lower your body down in a controlled, even manner. In other words, don’t hold yourself at the top for 5 seconds, then let yourself drop. Try to be as even as possible.
- Once you reach the bottom, repeat.
3 Lower Body Beginner Calisthenics Exercises
When training legs, you basically have three key focuses: squats, hip extensions, and lunges.
Let’s get into the best beginner calisthenics leg exercises!
1. Bodyweight Squat:
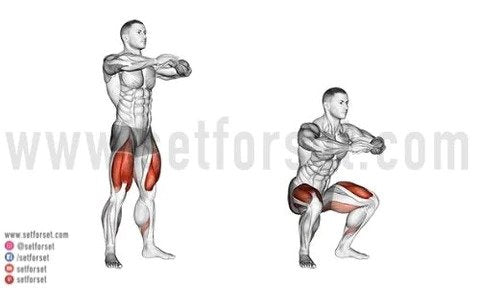
The body weight squat is a fundamental movement pattern that strengthens all the lower body muscles, making it an essential exercise for a best calisthenics workout for beginners.
You can not move on to more advanced exercises in a calisthenics leg workout until squats are second nature.
How to do a Bodyweight Squat:
- Get into your starting position by standing with feet slightly wider than shoulder-width apart. Turn your feet out slightly. Clasp your hands in front of your chest.
- Lower down, stopping when your thighs are parallel to the ground.
- Slowly return to standing, and repeat.
2. Glute Bridge:
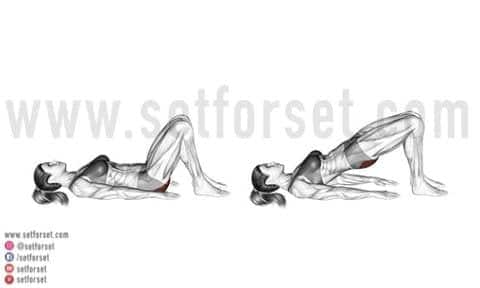
The glute bridge is excellent for your lower body’s posterior muscles. These are important as training your posterior muscles with hip extension can be difficult.
Master this move, because all other posterior exercises, such as single-leg variations and elevated glute bridges, build off of these.
How to do the Glute Bridge:
- Lay flat on the ground. While keeping your feet flat on the ground, bend your knees until your shins are vertical.
- Lay your arms out flat to the sides of your body at about a 45-degree angle. This has more to do with preference, so do what feels good.
- Brace your core and thrust your hips straight up. As you drive your hips forward, visualize yourself pushing the ground down with your feet. To get further activation, try to push down into the ground hard while also trying to “pull the ground” to your butt. This mimics a leg curl.
3. Walking Lunges:
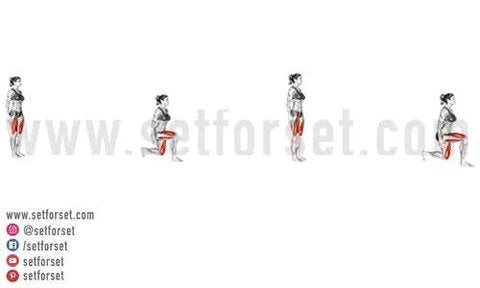
Walking lunges are one of our favorite leg exercises to use as a workout finisher. They train every muscle in the lower body as well as challenge your stabilizer muscles.
How to do Walking Lunges:
- With one foot, take one giant step forward with your toes pointing forward.
- Let your body drop straight down. Both knees should form right angles so adjust as needed. Your front knee should be straight above your foot while the rear knee is straight below your hip.
- Push up, bringing your rear foot forward, and then step out with it. Try to continue your steps in one, fluid, consecutive motion.
- Use reps for these and increase as you progress. However, they’re also good at the end of a workout when you are fatigued.
How To Progress To Calisthenics Gymnastics Exercises
As mentioned, one of the reasons people do calisthenics is because of the gymnastic and show aspects. The epitome of calisthenics, this is what calisthenics athletes strive for.
Many beginners look at gymnastics move and just assume they can’t do them. Maybe you can’t do one-arm handstands yet, but there is one relatively beginner-friendly gymnastic move.
1. Crow Pose:
The Crow Pose is probably the easiest gymnastic type movement to master. It is tough, but doable, which is exactly the type of bodyweight exercise you need to keep progressing.
The crow pose is seen in yoga and acts as a starting position for more complex movements. This movement will strengthen your shoulders and upper back while improving core strength. In addition, you’ll learn to balance your body weight.
How to do Crow Pose:
- You can do this on the ground, or you can place your hands on two elevated objects.
- Put both hands on the ground (or elevated object) flat and slightly turned out. Bend your elbows to a 45-degree angle. Place your knees just above each elbow. Be sure your elbows can support your body.
- Get on your tippy toes and slowly start to rotate your body forward so your feet come off the ground. Your body should be parallel to the ground and rotating forward.
- Try to stabilize your body and maintain this position.
Crow Pose Demo on YouTube
Calisthenics & Cardio
Another very important part of calisthenics for beginners is controlling the amount of body fat you have. As you are lifting your own body weight, less fat means less weight, which means you can progress to difficult exercises more easily. Again, this is a significant difference between calisthenics and bodyweight exercises.
Because you won’t be doing a ton of exercises, this leaves time to do some cardio, in particular HIIT and circuits. This includes various bodyweight exercises that can be performed quickly and in succession.
The Secret To Improving In Your Calisthenics Practice
In the world of calisthenics, there’s a practice called “greasing the groove,” which is an effective way to improve your calisthenics practice.
What this phrase means is that in addition to your calisthenic workout for beginners, you should also perform a rep or two of exercises throughout the day. For example, when you wake up, get on the floor and do a couple of push-ups. You are not working to failure or anywhere close.
There’s no specific number, but you shouldn’t exceed 10-20% of your max reps. If you can’t do more than 10, this means performing 1 or 2. The point is you’re doing a few reps to train your body for the movement while avoiding any type of fatigue.
It’s important to do this because it helps train your muscles to fire with efficiency. Therefore, the idea is to often perform low volume (a few reps).
Again, no optimum number has been identified, and we’re not even sure there have been studies on this. But when examining anecdotal evidence and testimony from top calisthenic athletes, we would say you should do it at least twice a day apart from training. Ideally, once when you wake up and once before sleeping.
It’s a good idea to find ways to do it throughout your day too, as it shouldn’t be time-consuming. If you’re watching TV, knock out 2-5 push-ups during a commercial. You may be surprised by how much this little trick helps.
Calisthenics Workout Plan For Beginners
These calisthenics workouts for beginners are relatively simple, focusing on the basics and instilling a solid calisthenics foundation. You have two sessions to alternate between, as well as a circuit to follow when time allows.
Ideally, perform each session twice weekly. You will use RPE for all of the exercises, excluding lunges and the circuit workout.
An RPE8 means to perform an exercise until 80% max. Your goal is to increase this amount every week. Assuming your weight isn’t a major issue, you should only need to run this ultimate calisthenics workout for beginners for 4-8 weeks before you start using more advanced calisthenics exercises.
Calisthenics Session 1:
|
Exercise |
Sets & RPE |
|
Incline Push Up |
4xRPE8 |
|
Inverted Ring Row |
4xRPE8 |
|
Bodyweight Squat |
3xRPE8 |
|
Dips |
3xRPE8 |
|
Banded Chin Ups |
3xRPE8 |
|
Walking Lunges |
50 reps |
|
Crow Pose Practice |
5-10 minutes |
Calisthenics Session 2:
|
Exercise |
Sets & RPE |
|
Negative Push Ups |
4xRPE8 |
|
Inverted Ring Row |
4xRPE8 |
|
Bodyweight Squat |
3xRPE8 |
|
Dips |
3xRPE8 |
|
Negative Chin Ups |
3xRPE8 |
|
Glute Bridges |
3xRPE8 |
|
Crow Pose Practice |
5-10 minutes |
Calisthenics Circuit:
|
Exercise |
Work/Rest |
|
Mountain Climbers |
40 seconds on/20 seconds rest |
|
V Sit-Ups |
40 seconds on/20 seconds rest |
|
Single-Leg Lateral Bounds |
40 seconds on/20 seconds rest |
|
Flutter Kick |
40 seconds on/20 seconds rest |
|
Split Squat Jacks |
40 seconds on/20 seconds rest |
|
Side-to-Side Rolling Plank |
40 seconds on/20 seconds rest |
Ready To Start Calisthenics Training?
The elite calisthenics athletes you see today were once complete beginners themselves. This is true for literally anyone who is a master of their craft. Saying calisthenics is hard is stating the obvious.
Of course, it’s hard!
But training calisthenics will get easier as you progress, and it truly is one of the most rewarding styles of strength training. When you’re finally able to knock out pistol squats, the feeling of knowing you have advanced functional strength and incredible body composition will be well worth the work.

